


Dryer not working? Don't despair. You might be able to fix it yourself.
If you have a basic understanding of electrical testing and can use hand tools, you can handle most common dryer repairs yourself. There’s no need to find a technician, schedule a service call or pay hundreds of dollars for dryer repair, and you can have your ailing dryer up and running in no time.
The dryer repairs we show in this article correct about 90 percent of dryer breakdowns. Most repairs take about an hour, but set aside extra time to locate replacement parts. Aside from basic tools like a socket set and screwdrivers, you may need a continuity tester or multimeter to diagnose the problem.
On This Page
Unplug Your Dryer Before Doing Dryer Repairs
The first step in any appliance repair is to make sure it’s getting electricity. Unplugged cords and tripped breakers are a leading cause of appliance “breakdowns.” Once you’ve verified power, unplug the dryer to prevent electrical shocks.
How to Disassemble a Dryer
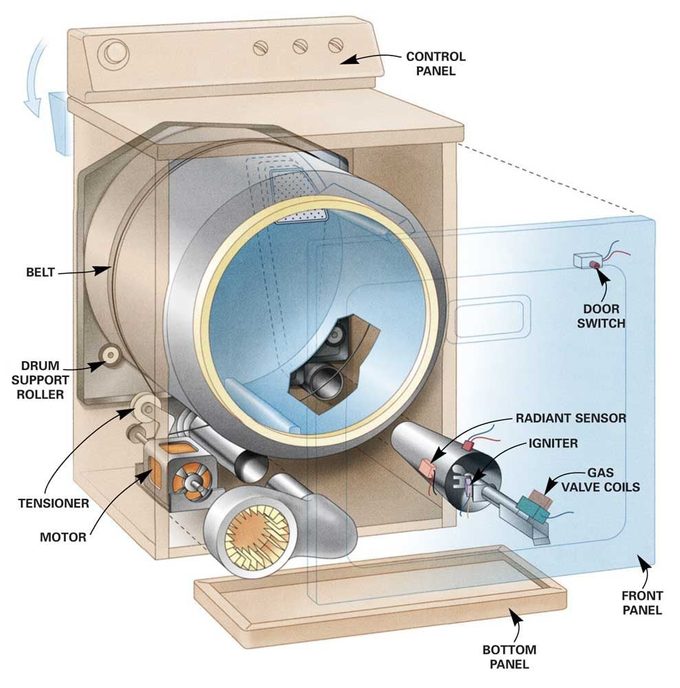
Most dryer repairs require some disassembly of the outer cabinet so you can get at the parts inside. Dryer disassembly varies slightly depending on the location of the lint filter. For gas dryers, most repairs require removing the top and front (not the back or sides) to access the parts.
If your dryer’s lint filter is inside the front door, disassemble it this way:
- Remove the screws at each corner of the control panel.
- Flip the panel up and back to expose the screws in the top panel.
- Remove the screws, then pull the top toward you and lift it off.
- Open the bottom panel by shoving a putty knife into the slot just above the spring catches and releasing them.
- With the bottom panel open, you can remove the front panel by removing two screws at the top and two at the bottom.
Some filters slide into the top of the dryer. In that case, remove the screws alongside the filter slot. Using a putty knife, release the two spring catches located under the top panel at the front. Tilt the top panel up like a car hood and remove the screws that hold the front panel in place.
How to Fix a Dryer That Won’t Start
If your dryer seems absolutely dead when you turn it on, make sure neither the circuit breaker in the main panel nor the GFCI outlet the dryer is plugged into have tripped. If not, chances are the door switch is bad or the plunger is broken or bent. Door switches wear out from normal use, but repeatedly slamming the door can speed up their demise.
Start by checking the plunger located on the door for dryer troubleshooting. If it’s missing or bent, replace it. If the plunger checks out, the next step of dryer troubleshooting is to remove the top cabinet panel to gain access to the door switch. See the disassembly instructions.
Test the switch for continuity
Here’s the procedure for testing continuity, provided by appliance repair technician Dennis Godynuk:
“First thing’s first—unplug the dryer. Then:
- Set your multimeter to the continuity (beep) setting and remove the switch from its housing.
- Touch the probes to the two switch terminals. If the meter beeps or reads near zero, the switch is good. If it reads ‘OL’ or gives no sound, that switch needs replacing.
- Always test it in each position—on and off—so you know it works every time.”
If the switch is good, do a continuity test on the thermal fuse mounted on the blower housing.
- Pro tip: If you have a gas dryer with the lint filter in the door, access the thermal fuse by opening the bottom panel. If the filter slides into the top of the machine, remove the entire front panel. On an electric dryer, remove the rear service panel.
If you don’t get a positive continuity reading from the thermal fuse, do NOT simply replace it. A blown thermal fuse is a warning that you have other serious problems—either a malfunctioning thermostat or a clogged vent. Fix those before continuing the dryer repair and replacing the fuse.
What to Do if Your Dryer Is Making Noises
The most likely cause of thumping or rumbling sounds is worn-out drum support rollers. Replace all of them. If the noise continues, replace the tensioner roller (see below). Since it takes longer to disassemble the machine than to replace the rollers and belts, we recommend replacing both at the same time.

Dryer Isn’t Heating
When your dryer isn’t drying clothes, the first thing to do is check the airflow from the dryer vent tube. It gets clogged with lint, preventing airflow and causing it to take a long time to dry clothes, if it’ll dry them at all. If that’s not it, there are a few other common fixes for a dryer that isn’t drying, everything from checking the breaker box to cleaning the lint filter.
However, there are other problems that could cause a dryer to tumble but not heat. Here’s a diagnostic procedure:
- Check the thermal fuse for continuity.
- If the thermal fuse checks out and you have a gas dryer, proceed to the radiant sensor. It monitors the igniter and powers up the gas valve coils when the igniter reaches peak temperature. A bum sensor will stop the whole show, so test it for continuity and replace it if it fails.
- Disconnect the electrical connector to the igniter and check it for continuity. Again, replace it if it fails the continuity test.
- Replace the gas valve coils if both the radiant sensor and the igniter pass the continuity test. To replace them, remove the retaining plate, unplug the sensors and pull them off the gas valve.
- Test the heater element for continuity on your electric dryer if the thermal fuse checks out. Replace the element if you don’t get continuity.
Dryer Doesn’t Rotate
It might be a broken belt. To replace it, remove the front cabinet panel and lift the entire drum out of the cabinet. Fire up your shop vacuum and suck out all the lint, then spin the tensioner roller by hand to see if it runs smoothly. Examine it for cracks. Replace the tensioner if it fails either test.
Reinstall the drum and wrap the new belt around it (ribs facing the drum). Some tensioners are mounted behind the motor, so they’re difficult to see from the front access panel. You’ll have to do this by feel. Reach your hands around the blower housing and lift the tensioner up while you route the belt around the motor pulley.
Dryer Door Won’t Stay Shut
If your dryer door won’t stay closed, chances are the latch is either bent or missing, or the strike is worn. The fix is cheap and easy, but you’ll need to buy parts.
Where to get them? “I lean on a few go-to sources,” says Godynuk. “For guaranteed fits, check your dryer brand’s official parts website. For everything else, RepairClinic.com and AppliancePartsPros.com have huge catalogs and clear diagrams. And don’t forget local appliance shops—they often stock common items and can get you same-day pickup plus hands-on advice.”
Now grab pliers, a couple of small, straight-slot screwdrivers and a roll of masking tape and do the following:
- Grab the bent or broken latch and yank it out.
- Install the new one, pushing in firmly until the locking tabs seat.
- Protect the door’s finish with tape and remove the old strike.
- Jam a small screwdriver into the strike and bend the metal locking tab inward. Pry upward with a second screwdriver to pop it out (Photo 2).
- Snap in the new strike and you’re back in the laundry business.
FAQs
When should I call a professional?
Godynuk answers this: “The moment you’re dealing with the 240-volt wiring or heating element, call a pro—those high-voltage components can kill if you slip up. Also, if you’ve tried basic troubleshooting and the dryer still won’t heat or tumbles oddly, it’s time to bring in someone with the right tools and training. And if your unit’s under warranty, a tech visit keeps that coverage intact.”
What should I do if my clothes are always still damp after running the dryer?
Start by checking airflow, says Godynuk. “Clean the lint trap and peek at the exterior vent cap—if air isn’t rushing out, your dryer can’t expel moisture. Next, test the heating element and thermal fuse with your multimeter; no continuity indicates they’re defective. Finally, make sure you’re not overloading the drum and that you’ve got the right cycle selected. Too many heavy items or the wrong setting will leave clothes damp every time.”
About the Expert
- Dennis Godynuk is the Lead Appliance Expert at Comfort Appliance Repair in Tennessee. Dennis and his team of skilled technicians specialize in fast and reliable repair services for all major household appliances.